Unlike MySpace, Twitter is very much alive, kicking and growing as a social media platform. Despite the fact teens prefer to spend their time filming and making pictures of themselves on Snapchat & Instagram, 500 million tweets are sent each day. Furthermore, 326 million people tweet each month, a number that almost equals the entire U.S. population. Impressive indeed.
Customers can potentially use this enormous pool of publicly available tweets to better understand market conditions and their customers. SAP understands this and has therefore developed a HANA Twitter adapter which customers can use to integrate Twitter data into their databases for further analysis. In this article, I’m going to show you how to do so in a native HANA scenario.
HANA Twitter Adapter
You can access Twitter data via the HANA Twitter Adapter. The Twitter APIs let you consume Tweets in a variety of ways: by doing a public search based on keywords, or by exposing your timeline, which both can be queried in batches or in real-time.
The HANA Twitter adapter is written in Java and uses the Adapter SDK and Twitter4j library to query Twitter data via SQL, using Virtual Tables and Virtual Functions. The Twitter Virtual Tables are basically a map of JSON data returned from Twitter to tabular form.
There are many Twitter APIs. Currently, the adapter covers only a few APIs, and is limited to the APIs provided by Twitter. Cheapskates rejoice! The APIs used by HANA are based on the standard (free) APIs, which means the APIs are free. The downside is that you can only query Tweets less than 7 days old. However, by persisting the standard Twitter APIs output in a HANA table, it’s possible to analyze Tweets older than 7 days.
Conveniently, the query results of all APIs used in HANA (except for the Application API) have the same table structure. Each query output, except for the Application API, contains the following columns (not in this particular order):
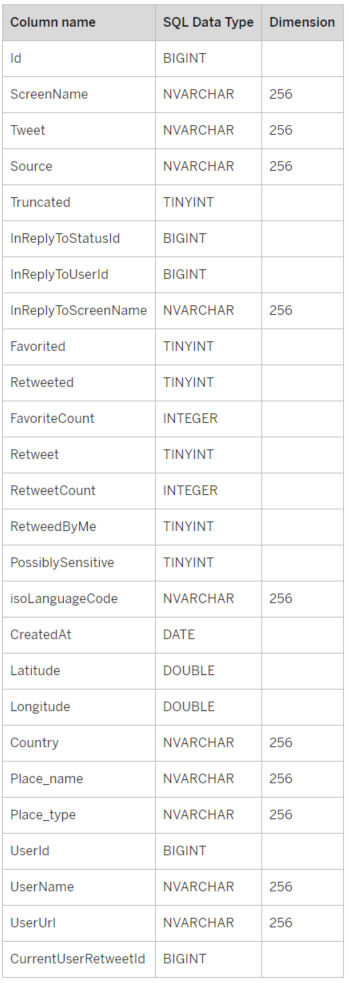
Image 1. Overview of columns returned by Twitter APIs used by HANA Twitter Adapter
Install & Configure DP Agent
First, the HANA Data Provisioning Agent (DP Agent) needs to be installed and running. This agent hosts all SDI Adapters and acts as the communication interface between HANA and the Adapter. We use the HANA Twitter Adapter to access Twitter data via SDI (Smart Data Integration).
You can verify whether your HANA system has a Data Provisioning Agent running by going to the Administration View of your HANA system (see image 2):
Image 2. How to access the Administration View of your HANA system
After you’re in the Administration View, click the Landscape tab:
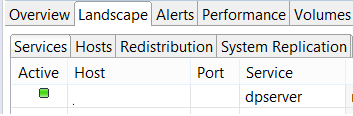
Image 3. How to check whether the DP Agent is running
If you see ‘dpserver’ and the Active icon is green (see Image 3), your DP Agent is up and running and you’re good to go. If not (or if the Twitter adapter has not been registered yet), ask your Database Administrator to install the Data Provisioning Agent by watching the video in the link below, where this process is explained in detail by Tahir Hussain Babar aka Bob:
Create a Twitter Account
Once the DP Agent is active and registered, you need to create a Twitter account to be able to query Twitter data via the Twitter API. As a bonus, you can share all your valuable thoughts with the world #influencer #motivation. Here is the link sign-up to Twitter:
To create an account, undertake the following steps:
- Enter a valid e-mail address and password for your new account
- Enter a full name
- Fill in a phone number. Twitter will send a verification code to that phone number to confirm you’re an actual person, so the phone number needs to be valid
- Choose a username
- Twitter will ask you what you’re interested in, you can ignore this
- Twitter will also ask who your friends are and suggest some accounts you can follow:
- Only follow accounts whose Tweets you would like to integrate into HANA
- Twitter will ask you, whether you want to turn on notifications: you can turn these on if you want to get Twitter notifications in your browser, even when you are not logged in
- Lastly, a confirmation mail will be sent to your e-mail address. Validate your account by clicking the confirmation button in the mail
Now that your Twitter user is up and running, you’re ready for the next step: creating a ‘Twitter App’ (Twitter Application). The Twitter App will let you use the Twitter API to query Twitter data. To create a Twitter App, go to: https://apps.twitter.com/
While logged in, click ‘Create New App’. In the App creation screen:
- Give the Twitter App a name
- Give it a description
- Fill in a website (can be any dummy website, the website is not needed for our use case. The dummy website does need to have a valid URL format however)
- Callback URL (you can leave this empty)
- Click: Yes, I have read and agree to the Twitter Developer Agreement and click the ‘Create your Twitter application’-button once you’re ready
Now that you’ve created your Twitter App, the next step is to create a Remote Source. You’ll use this Remote Source to set up the connection between your HANA Database and Twitter. To create a Twitter Remote Source, we’ll use the information in the Keys and Access Tokens tab of your Twitter App page and select the HANA Twitter Adapter.
Create a Remote Source
To create a Remote Source, go to the Provisioning map in the HANA Studio Systems View, right-click the Remote Sources map and click ‘New Remote Source’.
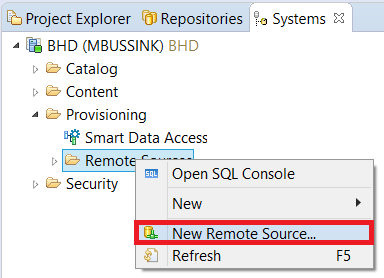
Image 4. How to create a Remote Source
Select the Twitter Adapter from the Adapter Name dropdown list and fill in a name for the Remote Source in the Source Name field. Also make sure the right agent is selected in the Source Location section on the right side of the Adapter Name.

Image 5. Select the HANA adapter from the drop-down list and name the Remote Source
At this point we need to go back to our Twitter App application management site at: https://apps.twitter.com/
This is because we need our Twitter app to get the:
- Consumer Key
- Consumer Secret
- 0auth Token
- 0auth Secret
You can find the Consumer Key (API Key) and the Consumer Secret (API Secret) in the Application Settings section in the Keys and Access Tokens tab. In the Remote Source they are named the other way around: API (Consumer Key) and API Secret (Consumer Secret), but these items refer to the same thing. Paste your Consumer Key and Consumer Secret in their respective fields in the New Remote Source screen. You can leave the Credentials Mode as ‘Technical User’.
For the Access Token and Access Token Secret, scroll to Token Actions at the bottom of the Keys and Access Tokens tab of your Twitter App Application Management site and click ‘Create my access token’.
After you’ve clicked you can see the Access Token and Access Token Secret in the ‘Your Access Token’ section of the Keys and Access Tokens tab. Paste the Access Token and Access Token Secret in the appropriate fields in the ‘New Remote Source’ screen.
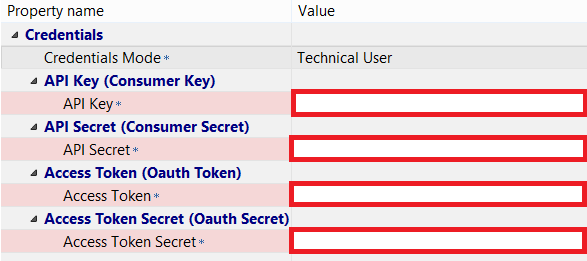
Image 6. The Remote Source fields that need to be filled
Congrats, you now have acquired more secrets, tokens and keys than an undercover agent. After you’ve filled in all the fields in the ‘New Remote Source’ screen, press the ‘Save this editor’ button (see Image 7 below):
Image 7. How to save a Remote Source
You need to have the right privileges to create a Remote Source. If not, ask your admin to grant you the necessary privileges.
Once you’ve entered all the fields correctly, you might still experience an internal error (Cannot get remote source objects: 401), due to the HANA time zone not being in sync with your Twitter user’s time zone. Your Twitter time zone settings need to be the same as the time zone settings of your HANA system. If the time zone settings are not equal, you need to match your Twitter time zone settings to those in HANA. You can do this by going to Settings and Privacy (see Image 8 & 9).
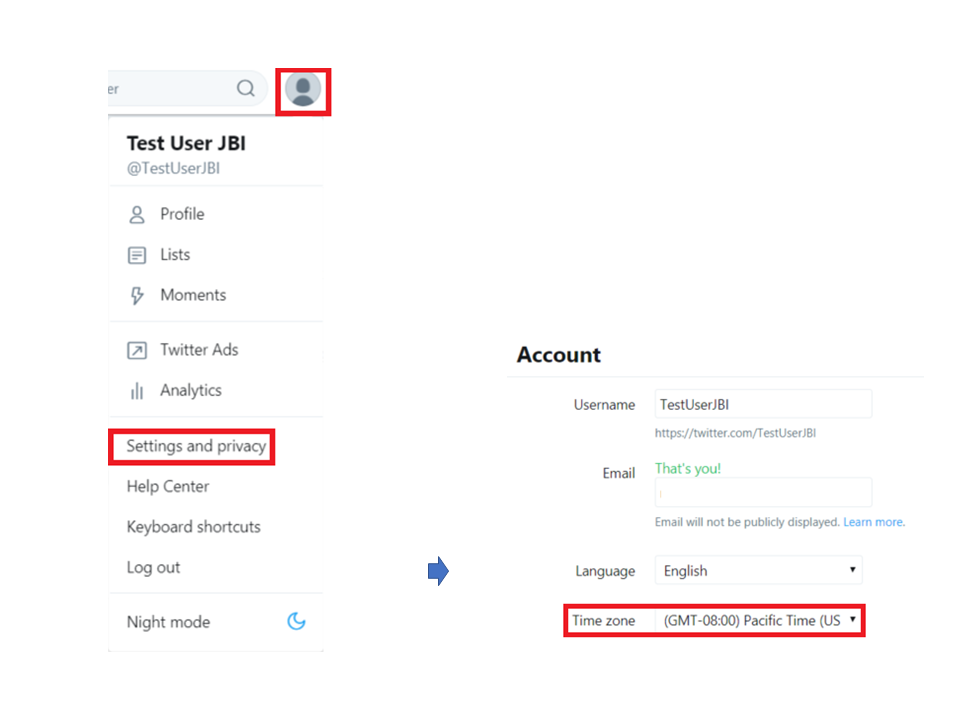
Image 8 & 9. How to change the time settings in your Twitter account
You can check the time zone of your HANA system by executing the following SQL statement:
![]()
If your HANA DB has time zone set to CET for instance, put the Time zone of your Twitter user to (GMT +01:00). After that, try saving your Remote Source again and it should work.
Now you’ve created a Remote Source, you have access to the Virtual Tables and Functions of the Twitter API. In the next sections I’ll explain how to query Twitter based on the different APIs and insert your query output into a HANA Table. I won’t discuss the Status API, because it is deprecated.
Virtual Functions
In this section we’re going to create Virtual Functions, starting with the Tweets Virtual function, which returns a collection of Tweets matching a keyword.
The Tweets Virtual Function is based on the Search API. The Search API is not meant to be an exhaustive source of Tweets. Not all Tweets will be indexed or made available via the search interface. Also, the search index has a 7-day limit i.e. it does not return any results older than one week. To bypass this restriction, we can create a HANA Stored Procedure and schedule a job to store the Tweets query output in a HANA Table. That way we can analyze Tweets that are older than 7-days #preservehistory.
You cannot create a Virtual Function in HANA Studio, so you’ll have to log into the HANA Web IDE. Once you’re in the WEB IDE click on Catalog and then browse to the Provisioning folder. Expand your Twitter Remote Source by clicking on the arrow on the left side of the Remote Source, to access its Remote Objects. If you expand all the folders under the Twitter Remote Source, you’ll see that some of the objects look different from the others. That is because the icons with a red background are Functions and not Tables.
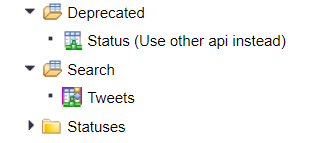
Image 10. Remote Functions vs. Remote Tables
You cannot use any of these Remote Objects yet. In this section, we’re going to use the Tweets Function in the Search folder.
To use the Tweets function, we first need to create a Virtual Function on top of it. Creating a Virtual Function is part of HANA SDA (Smart Data Access) technology. SDA lets you use and model Remote Objects as if they were physically stored in HANA. You create the Tweets Virtual Function by right-clicking the Tweets Remote Object function and then clicking ‘New Virtual Function’. Fill in the Virtual Function name and the Schema where you want to store the Virtual Function. After clicking OK, you should see a system message stating that the Virtual Function was created successfully.
Now that you have made a Virtual Function, how do you use it? For some strange reason, you can only use a Virtual Function in the Web IDE, not in HANA Studio. You use the Virtual Function by right-clicking in the Functions folder of the Schema you specified while creating the Virtual Function. After right-clicking the Virtual Function, select: ‘Invoke Function’. This triggers an SQL statement to appear in the SQL Editor that you can use to query Twitter. However, before you can execute the Virtual Function you first need to fill in several parameters.
Here is an overview of the parameters you can use to query Twitter using the Tweets Virtual Function:
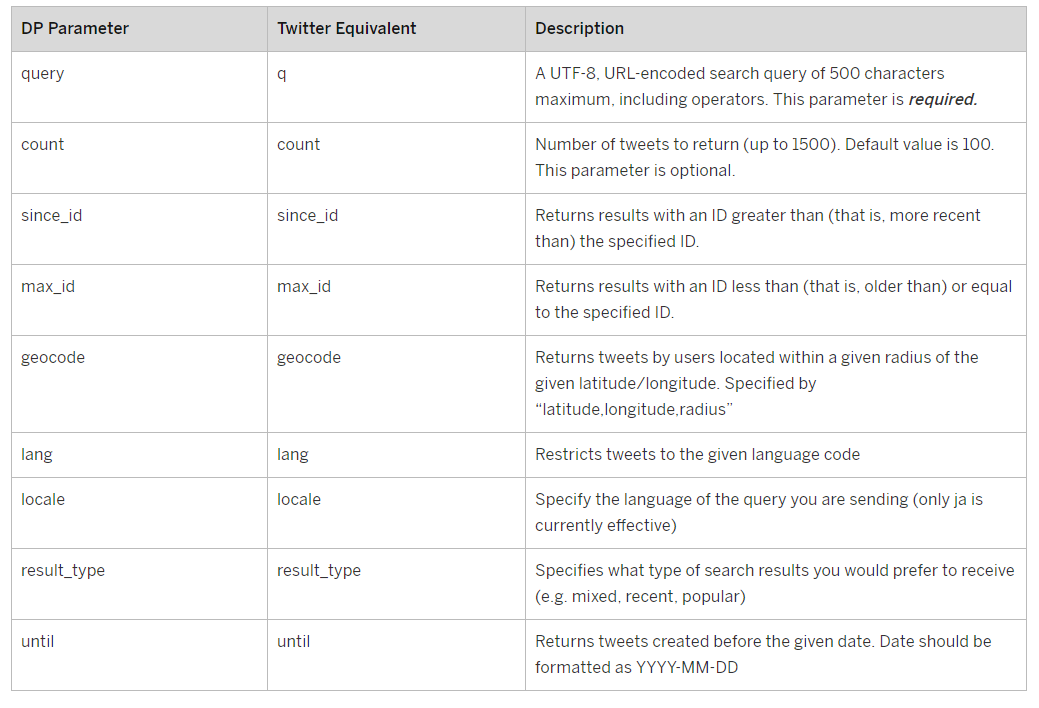
Image 11. Tweets Virtual Function Parameters
Each Tweet has its own Tweet ID. The newer the Tweet, the higher its Tweet ID. The ID parameters are used to filter the output based on Tweet IDs. The SINCE_ID parameter can be set to 0 or can be used to implement a delta by passing it the maximum Tweet ID in our HANA Tweets table. The maximum value you can set MAX_ID to, is 9223372036854775807 (the maximum value of the BIGINT data type). See Image 12 for an example of a successful SELECT statement based on the Virtual Function.
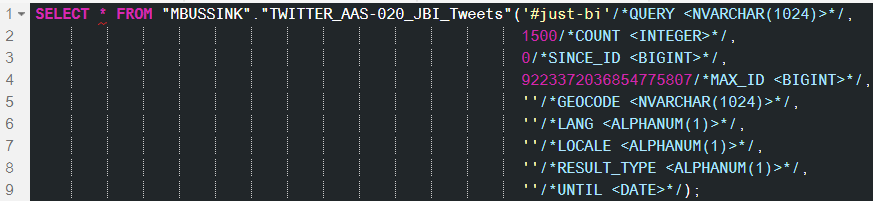
Image 12. Tweets Virtual Function query example
Technically, the Home Timeline and the User Timeline Virtual Function work exactly like the Tweets Virtual Function. They only differ in the amount and the type of parameters you can pass to the function.
The Home Timeline Virtual Function returns a collection of the most recent Tweets and retweets posted by the authenticating user and the users they follow. The Home Timeline Virtual Function query output is equivalent to what a user sees when they go to their home page on Twitter. It is based on the Statuses API.
Here is an overview of the parameters you can use in the Home Timeline Virtual Function:
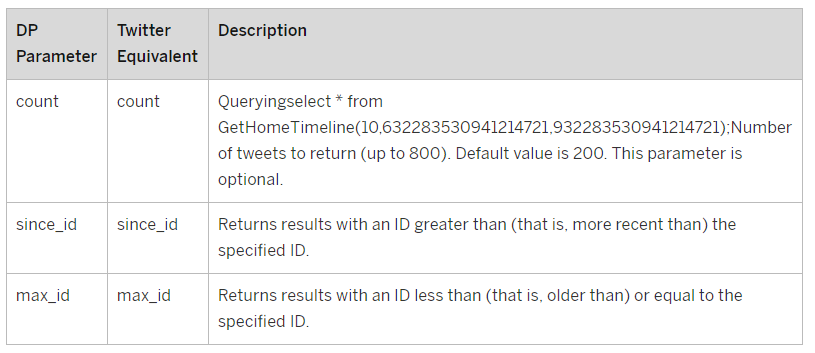
Image 13. Home Timeline Virtual Function Parameters
The User timeline virtual function returns a collection of the most recent Tweets posted by the user indicated by the field: screen_name. The timeline returned is the equivalent of the one seen when you view a user’s profile on Twitter. Like the Home Timeline Virtual Function, it is based on the Statuses API.
Here is an overview of the parameters you can use in the User Timeline Virtual Function:
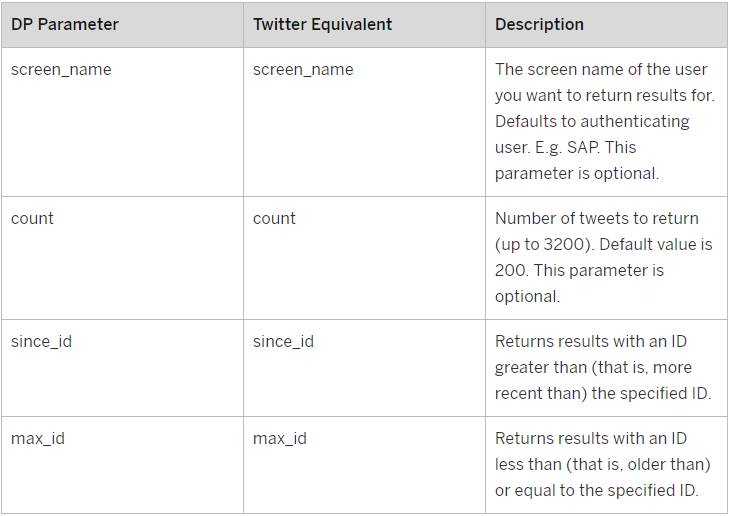
Image 14. User Timeline Virtual Function Parameters
Streams
If you think batch queries are so passé/1980s, no worries. You can use the Public and User Stream Virtual Tables to retrieve real-time data from Twitter. You can use the CREATE REMOTE SUBSCRIPTION statement on the Virtual Tables from the Streams API to replicate data in real-time to a HANA Table. An advantage of using Streams is that you can query multiple keywords, contrary to the Tweets Virtual Function.
A Subscription has multiple states:
- Freshly created or in reset state: The subscription exists but does not do anything. No information has been sent to the adapter yet.
- Alter remote subscription queue: This command signals the adapter to start collecting changes. They are sent to HANA and queued there. The target table is not being loaded! Now you can run the initial load and get all the data into the target table. This will not fail with a primary key violation because the real-time part does not insert any rows yet. This adds a begin marker row in the real-time data stream.
- Alter remote subscription distribute: This adds an end marker in the data stream and starts loading data from the queue into the target table. Everything between begin marker and end marker is inserted into the target table carefully (upsert), everything after the end marker is loaded with the proper code (insert/update/delete).
The Public stream returns public statuses (public data flowing through Twitter) that satisfy the filter condition.
Because the output from streams has the same structure as the Tweets Virtual Function query output, you can create a HANA Table using the same table structure.
To create the necessary Virtual Table, go to the Catalog and then go to the Provisioning folder. Expand your Twitter Remote Source.
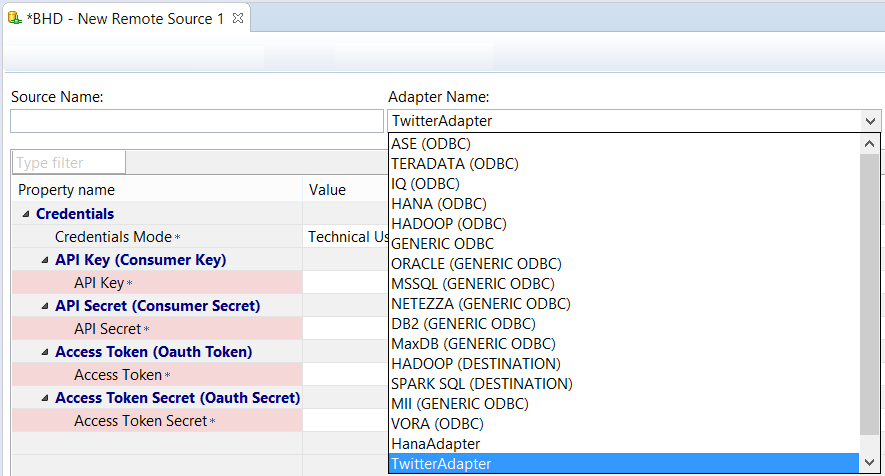
Image 15. How to create a Public Stream Virtual Table
Right-click the Public Stream Remote Table and select ‘New Virtual Table’ (see Image 15). Fill in the Virtual Table name and the Schema where you want to store the Virtual Table to finish the creation-process.
Before you can use the Stream, you need to create, queue and distribute a Remote Subscription on the Virtual Table. By doing that HANA automatically fills the HANA table with any new Tweets that satisfy the filter. Here is an example of the Remote Subscription statements you need to stream data into your Public Stream Table:
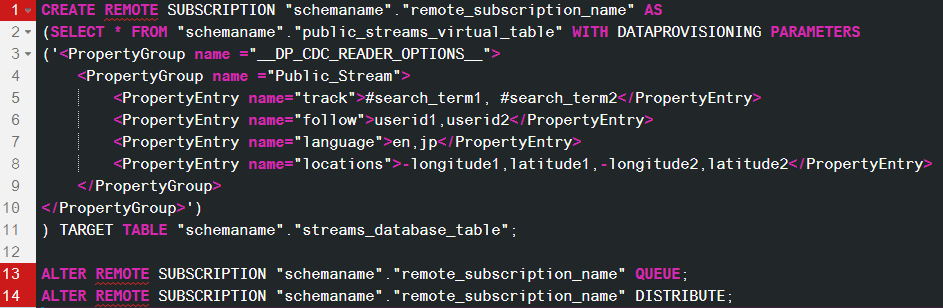
Image 16. Public Stream Remote Subscription syntax
To drop a Remote Subscription you no longer use, use the following SQL code:
![]()
Contrary to a normal Virtual Table you cannot open Stream Virtual Table content directly; you first need to filter the output based on data provisioning parameters. Though all these parameters are optional individually, at least one of the track, follow or locations parameters needs to be entered while creating a Public Stream Remote Subscription. Track, follow, and locations parameters are executed the same way as an OR operator.
Here is an overview of the parameters you can use in the Public Stream method:
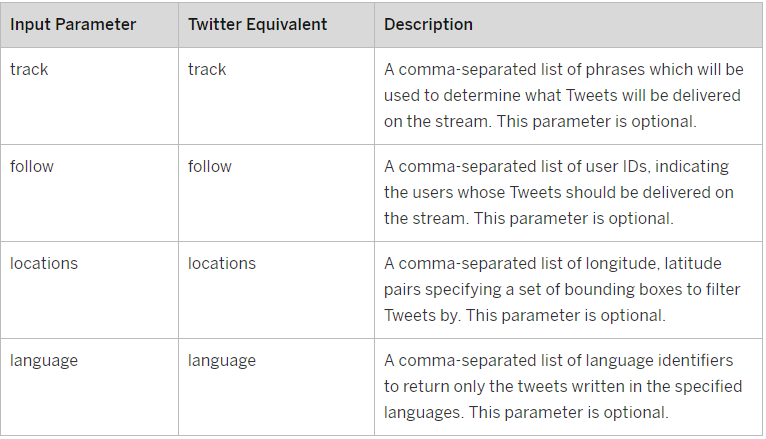
Image 17. Public Stream Parameters
If you do not want to pass a value to these parameters, you can remove its line from the code.
After creating, queueing and distributing the Remote Subscription, your HANA table should automatically fill with Tweets that satisfy the filters you used in the parameters of the Remote Subscription.
User Streams provide a stream of data and events specific to the authenticated user. User streams provide a way for a single user to stream the equivalent of their home timeline (the tweets authored by the users they follow) and mentions timeline (the tweets authored by users mentioning that user).
In addition to providing user stream data, you can specify a comma-separated list of phrases which will be used to determine what Tweets will be delivered on the stream. A phrase may be one or more terms separated by spaces. Also, a phrase will match if all the terms in the phrase are present in the Tweet, regardless of order and ignoring case. By this model, you can think of commas as logical ORs, while spaces are equivalent to logical ANDs. For example, ‘the twitter’ is the AND twitter. the, twitter is the OR twitter.
The only difference with the Public Stream is the User Stream only has one optional parameter. Here is the syntax for a Remote Subscription statement without a parameter:

Image 18. How to create a User Stream Virtual Table
After creating, queueing and distributing the Remote Subscription, your HANA table should automatically fill with interesting Tweets from your Home Timeline. These Tweets will also include Public Tweets based on the keywords entered in the Track parameter if you added the keyword tracking parameter to the CREATE REMOTE SUBSCRIPTION statement.
Here is the standard syntax you can use to create a Remote Subscription with keyword tracking:
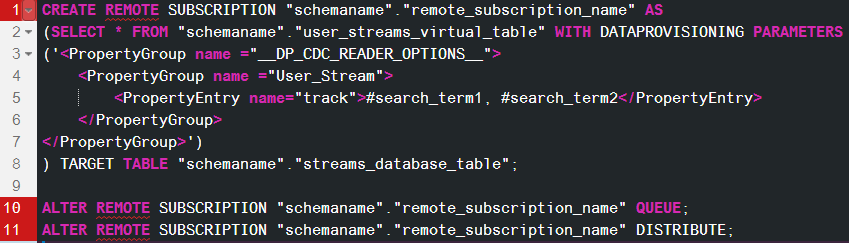
Image 19. User Stream Remote Subscription syntax with keywords tracking on
Rate Limit Status
The sky is not the limit if you use any of these free Twitter APIs, there is an actual limit for each API. You can find out what the current rate limits are for the endpoints of the Twitter Adapter batch querying methods. All you have to do is create a Virtual Table on the Rate Limit Status Remote Table in your Remote Source. The Rate Limit Status Virtual Table will then appear in the Schema you specified, and you will then be able to use the Virtual Table to get the current rate limits for your HANA Twitter adapter. You create the Rate Limit Status Virtual Table by right-clicking the Rate_Limit_Status Remote Table under the Twitter Remote Source and selecting New Virtual Table (see Image 20).
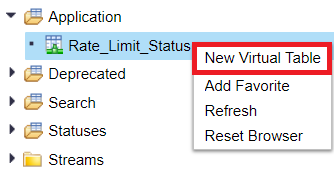
Image 20. How to create the Rate Limit Status Virtual Table
Then, enter a name for the Virtual Table and the Schema you want to put it in (see Image 21). After you press OK your Table will appear in the Schema you specified.
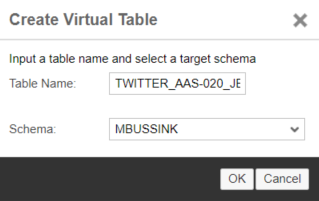
Image 21. How to configure a Virtual Table during creation
You query a Virtual Table by right-clicking it and selecting ‘Open Content’, like a regular table. The Rate Limit Status Virtual Table shows the rate limit, the number of remaining requests and the time until the limits will be reset for each method (see Image 22).

Image 22. Example of Rate Limit Status Virtual Table output
Summary
We have seen how we can integrate Twitter data into HANA and subsequently query Twitter data based on a range of virtual objects. What’s the next step? That is less clear. You could for instance, use text analytics to define customer attitudes regarding a new product. Alternatively, you could also try and gauge a social media campaign’s effectiveness by checking the popularity of specific keywords. Or you could try and use the data to meddle in foreign elections (which we do not recommend). Whatever you do, use your new Twitter integration powers wisely and try and deal with the data in a responsible and just way #just-bi.
Note: this article has been writen by Michael Bussink and is the result of his work at Just-BI. Just-Thank you Michael.
Top Image by Gerd Altmann from Pixabay