Following up on my last blog on Snowflake, I decided to investigate another option it provides. Snowpipe is Snowflake’s continuous data ingestion service. It provides a pipeline for loading new data as soon as it is available, either in an internal or external stage. For this project, I decided to set up my Snowpipe to make a connection between an external AWS S3 stage and Snowflake.
Once Snowpipe is set up, the pipe will run as soon as new files are discovered in the stage, automatically loading the data into the snowflake table. Without Snowpipe, you would need to identify the new file and load it explicitly yourself by running the COPY command.
General process flow
For this project, I used an AWS Lambda function to call the Snowpipe REST API to load the data from my S3 bucket to Snowflake. AWS Lambda runs when it is triggered by an event. Here, the event is defined as the load of a new file in the S3 bucket. The event calls the Lambda function that has been loaded into the system, and runs the Python code that invokes the Snowpipe REST API.
The process flow can be described in five basic steps:
- Data files are loaded in an external S3 stage.
- The new files trigger a Lambda notification event, which calls the Lambda function.
- The Lambda function contains a deployment package, which includes the python function code. This function invokes the insertFiles endpoint, passing the name of a previously defined pipe and the list of files that are to be ingested as parameters. Once Snowflake has recorded the list of files to add to the table, you will get a successful response from this endpoint.
- The endpoint moves these files to an ingest queue.
The definition of the pipe contains a number of parameters, that specify exactly how to load the data, and into which target table. A virtual warehouse (provided by Snowflake) loads data from the queued files into the target table based on these parameters.
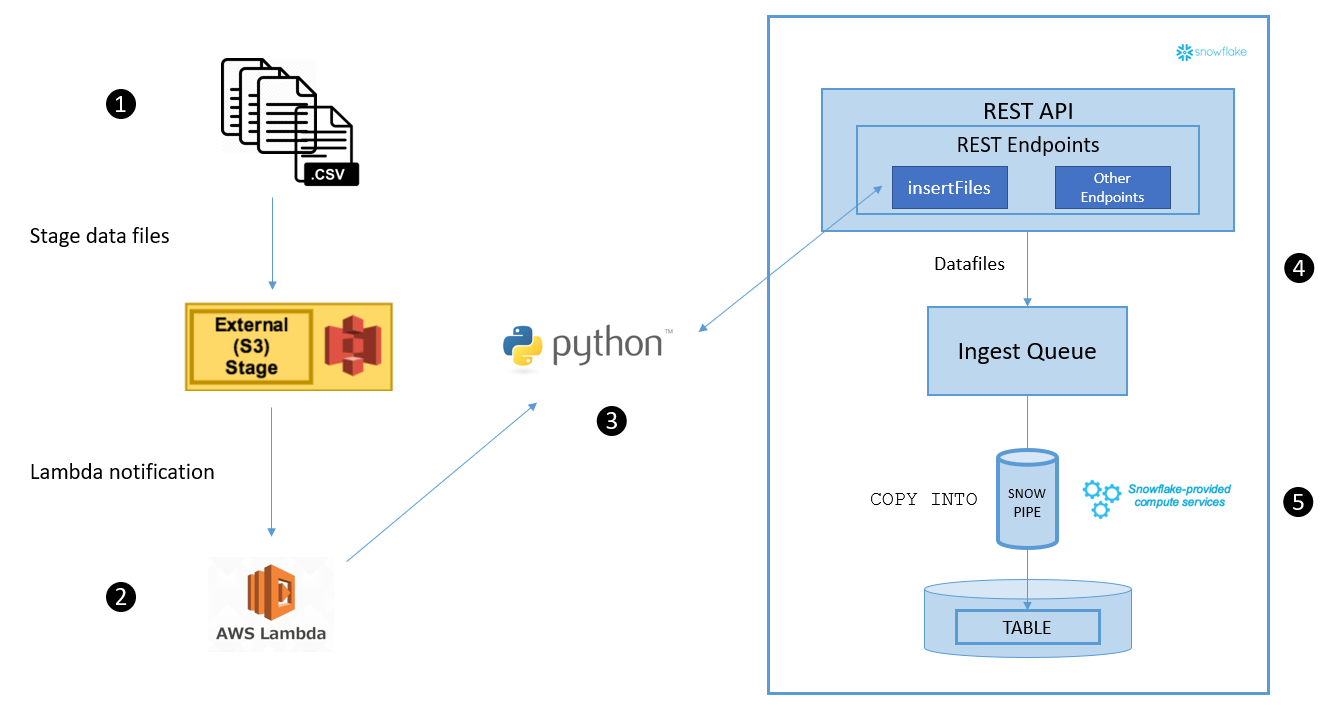
Figure 1. Snowpipe process flow
Configuration and Preparation
There are a number of things that we need to configure before we can automate Snowpipe using AWS Lambda:
- S3 Bucket
- File format
- Snowflake stage
- Snowflake target table
- Snowflake pipe
- Python Software Development Kit (SDK)
- RSA Key-Pair
- Snowflake role
Let’s take an extensive look at each of these items and dive into the details:
Setting up the S3 Bucket
An AWS S3 Bucket is a public cloud storage resource. You can upload objects using the Amazon S3 API, or use the Amazon S3 console. This bucket will be the external stage that will be used for our Snowpipe. The stage can be seen as the location where will load the data files that we want to copy into our Snowflake table. I created the S3 Bucket using the AWS console.
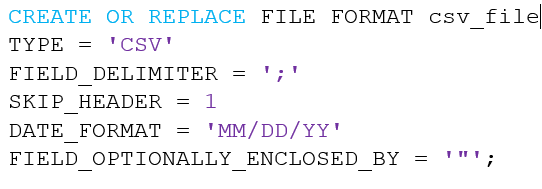
Create a file format
The data files that we want to load are CSV files, with a specific format. Snowflake offers the option to create your own file format for bulk loading data using CREATE FILE FORMAT . Per file type you have a lot of options. For the specific CSV file in this project we needed to set how the data is separated (‘;’), the date format (‘MM/DD/YYYY’), and how many header rows need to be skipped (‘1’). Additionally, I had to use the FIELD_OPTIONALLY_ENCLOSED_BY, because the data in all but one column were enclosed in double quotes (“X”). When a field contains this character, it will be escaped using the same character.
Create a Snowflake stage, target table, and pipe
After creating the external stage and the specifying the file format, we create a Snowflake stage using CREATE OR REPLACE STAGE. Here you specify the URL to your earlier created S3 bucket, the credentials (the AWS key id & secret key linked to your user), and the file format of the files you want to load.

Here, you can use SHOW STAGES to see if the creation of your stage was successful.
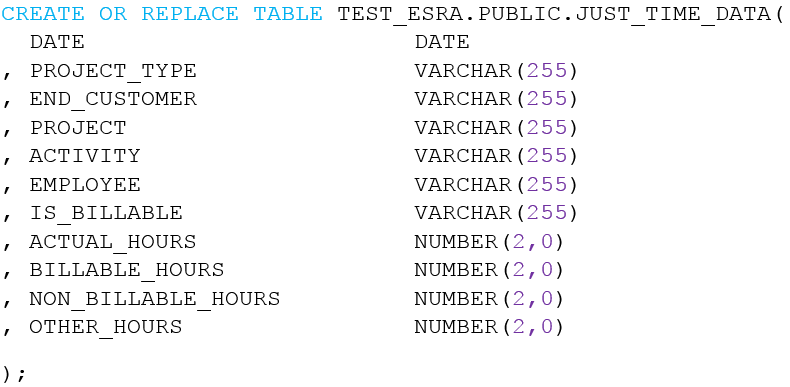
We also need a target table in Snowflake to which the data should be loaded, using CREATE OR REPLACE TABLE.
Lastly, we define the pipe, using CREATE PIPE in Snowflake. Here you specify the target table (COPY INTO), the stage (FROM) and the file format you have created. Also, we can check our created pipe by using show pipes.

Install a client Python SDK
Install a client Python SDK for calling the Snowpipe REST endpoints to load the staged data files. The SDK requires Python 3.4. or higher. Use the following command: pip install snowflake-ingest
Security
Set up the security for the user who will load the data. We want to set up a key-pair that allows the user to make calls to the Snowpipe REST endpoints. Snowflake only supports key-pair authentication, which requires a 2048-bit RSA key-pair. I generated an encrypted PEM public-private key pair using OpenSSL.
First, I generated an encrypted private key running the following command:![]()
To encrypt the private key file, a passphrase needs to be provided. Eventually, when connecting to Snowflake we will need this passphrase. My private key is now stored in a file named rsa_key.p8 .
Then, I generated the public key, using a reference to the private key: ![]()
The public key needs to be assigned to the Snowflake user:![]()
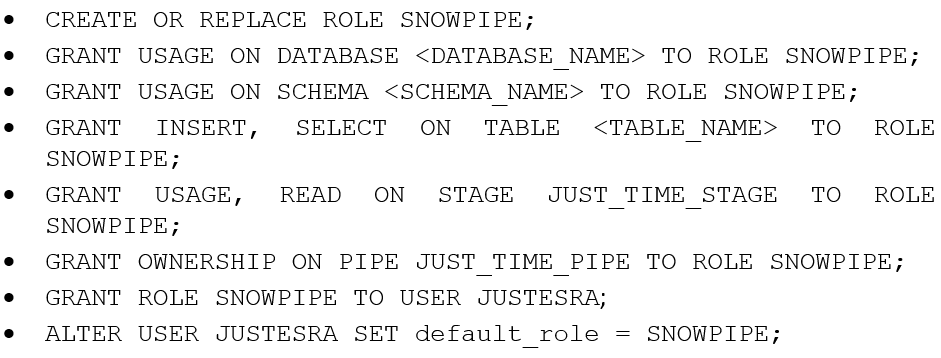
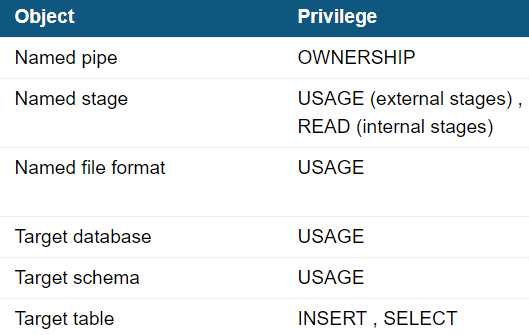
Create a snowflake role
Additionally, the user that “executes” the Snowpipe needs to have a role with the permissions as listed in the table below. You can create this role in Snowflake, using the statements:
Setting up the Lambda function
After these preparations, we can continue with setting up the continuous data load using AWS Lambda. This is a compute service that runs when triggered by an event, and it will execute code that has been loaded into the system. In this project, we are going to create a Lambda function that calls the Snowpipe REST API to load data from the S3 bucket (external stage). The function is deployed in your AWS account, and it is hosted here as well. When the event occurs, your Lambda function will be invoked and a Python code (which invokes the Snowpipe REST API) will run.
Write the Python code invoking the Snowpipe REST API
First, we need to write Python Code invoking the Snowpipe REST API. A sample code is provided by Snowflake, where you only have to update the security and session parameters. Here you use the private key file we created earlier. I saved this file as SnowpipeLambdaCode.py
AWS EC2 Linux instance
An AWS EC2 Linux instance is a virtual server in the AWS cloud. This provides the compute resources to run the Snowpipe code. I launched an instance using the Amazon EC2 console. During the creation of the instance, we generate a new key-pair in a .pem file. We need it to connect to the instance later on.
I had a bit of trouble here setting the right security settings to the .pem file. Eventually, I discovered that this was due to the fact that I saved the file onto a shared server. After I directly saved the file to a folder on my C: drive, I could allow Read & Execute to only my own user.
Using Secure Copy (SCP), copy the Snowpipe code to the instance:
![]()
<path> is where you saved your local SnowpipeLambdaCode.py file
<machine>.<region> is the DNS name of the EC2 instance (you can find this in the Amazon EC2 console)
After this, we connect to the EC2 instance using Secure Shell:
![]()
Once we are connected to the EC2 instance, we can install Python and its related libraries on it. You will need several commands for this:
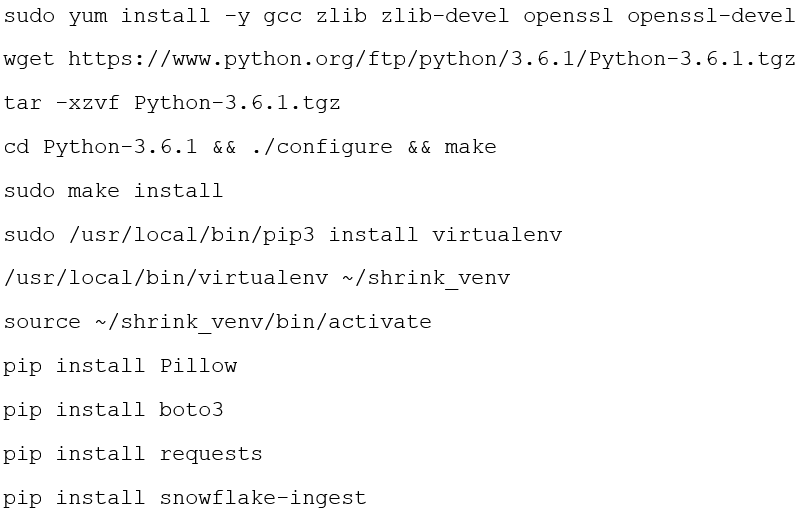
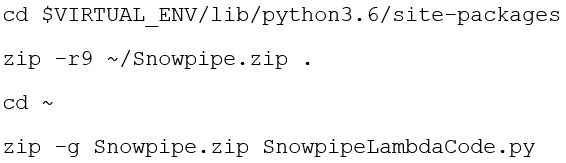
Once your code is copied and Python and related libraries are installed on the EC2 instance, you can create the deployment package. This is a .zip file containing your Lambda function code and its dependencies. The deployment package needs to be created because we use libraries other than the AWS SDK. I have uploaded the deployment package directly to Lambda, but you can also use an Amazon S3 bucket and then upload it to Lambda.
AWS IAM Role
Set up an AWS IAM Role that can execute the Lambda function, by providing the role with the right trusted entity (AWS Lambda) and the correct permissions. In the next step we will need the IAM Amazon Resource Name for the role. This ARN can be found in the AWS console.
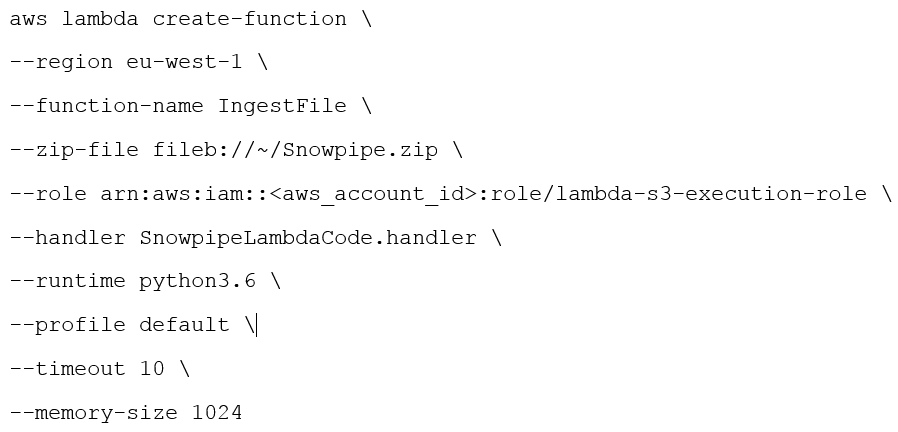
Create the Lambda function
Using the IAM role you created, we create a Lambda function ( IngestFile ) by uploading the deployment package. To get through this step it’s important to also have a profile linked to your role. This is where I got stuck for a while during the set-up, as I did not have any profile configured to my role. However, this profile is necessary to get the AWS Command Line Interface (CLI) to interact with AWS, as it includes your security credentials. You can add a profile using $aws configure (which creates the default profile that is used anytime you don’t explicitly specify a profile to use), or using $aws configure –profile <profilename>; to create additional profiles. Once you run the command, the AWS CLI prompts you for your access key, secret access key, AWS region, and an output format.
Once you have set up aprofile for your role, use the following command:
Link S3 to the Lambda function
By granting S3 the permissions to invoke your function, we make sure that calls to the Lambda function are allowed. We basically link S3 to the Lambda function function you created.

Lastly, in your S3 bucket, register a Lambda notification event. For my project, I did this using the Amazon S3 console, but it’s also possible using AWS SDKs. You link this event to your Lambda function, and the event will now trigger the Snowpipe process flow once a new file is added into your bucket!
Operating and Monitoring the Snowpipe
Once you got your pipe up and running, you might want to get some insights in its behavior. You can use, amongst others, the following expressions:
Pipe status
SYSTEM$PIPE_STATUS (‘<pipe_name>’). This query retrieves a JSON representation of the current status of the pipe. The output indicates the pipe’s status, the number of pending files in the pipe, in case of an error the error message, and if applicable the most recent internal Snowflake process error.
Loading history
You can also use the COPY_HISTORY (TABLE_NAME => ‘’, START_TIME => [, END_TIME => } ) to query Snowflake data loading history. It loads activity for both COPY INTO <table> statements, but also for continuous data loading using Snowpipe. Note that the function returns activity only within the last 14 days, so the start- and end time (in TIMESTAMP _LTZ format) should be given in within that time frame. Only for END_TIME there is a default option, the START_TIME should always be specified.
Alter pipe
ALTER PIPE <name> modifies the properties for an existing pipe object. Here you can pause, refresh, or add, overwrite, or remove comments for a pipe. When the PIPE STATUS is set to be STATUS , we can continue to submit files. These will not be processed until the pipe is resumed.
Pipe usage history
To query to history of data loaded into Snowflake tables using your Snowpipe, you can use PIPE_USAGE_HISTORY . The output includes the number of credits used, the number of bytes and the number of files inserted. The function can return pipe activity up to 14 days, but as default will show previous 10 minutes of data load history. You can extend this by specifying the optional DATE_RANGE_START and DATE_RANGE_END parameters. Depending on the length of the range, the history is displayed in increments of 5 minutes, 1 hour, or 24 hours. However, this function can only be used for a role that has been granted the MONITOR USAGE global privilege.
Summary
In this blog, I introduced you to Snowflake’s continuous data ingestion service: Snowpipe. I described the flow from loading data files into an AWS S3 bucket, which triggers the AWS Lambda function. This will execute Python code invoking the Snowpipe REST API.
This blog covers in detail what we need to configure and prepare for setting up our Snowpipe, and explains how we can set up the connection between AWS S3 and Snowflake by creating the Lambda function.
If you are interested in reading more information about Snowpipe and/or the Snowflake commands used in this blog, please refer to the Snowflake documentation.
This article belongs to
Tags
- dataingestion
- REST
- snowflake
- snowpipe
Author
- Esra Koenen